8. Utilities Menu
8.01 Company8.02 Charge Codes8.03 Departments8.04 Depots8.05 Customer Types8.06 Expiry Types8.07 Pallet Types8.08 Vehicle / Trailer Types8.09 Vehicle / Trailer Category Types8.10 Fleet Status8.11 Driver Incident Reasons8.12 Training Categories8.13 Industry Codes8.14 Customer Fuel Surcharge Allocation8.15 Deleted Deliveries Report
|
FREIGHTMATE LIGHT HELP6. Deliveries6.01 Enter ConsignmentsConsignment Note
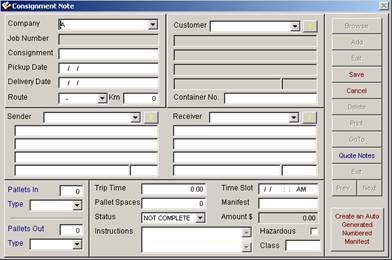
Company: This will default from the main company record - eg. Company A = your Company name Job Number: No data entry required. This field is system generated. Consignment: This can be manually entered, for example if you have docket books pre-printed, these numbers can be used, or if this field is left blank the system will automatically generate a number. Pickup Date: Enter the pickup date of the consignment. Delivery Date: This will default to the next day after the pickup date, but can be overwritten if required. Route: Delivery route as set up in the route code files in the File menu. A valid route code must be entered in this field. KM: The distance between origin and destination on the route code file. This will default from the route code file if it has been entered there or it can be entered manually. Customer: Customer code as set up in the File Menu. This is the company to be invoiced. When the customer code is entered, the name and address will show in the fields directly under the customer code. Container No: Enter container number or if not required, leave blank. Sender: Uses sender/receiver codes as set up in the Sender Receiver File in the File Menu. These codes are for frequent pickup and/or delivery addresses. If a code has not been set up, the name and address can be manually entered in the fields directly below the code box. Receiver: Uses sender/receiver codes as set up in the Sender Receiver File in the File Menu. These codes are for frequent pickup and/or delivery addresses. If a code has not been set up, the name and address can be manually entered in the fields directly below the code box. Pallets In: This is for recording the number of pallets on the consignment when it is picked up. It is not mandatory to make an entry in this field. Type: This is for pallet type as set up in the Pallet Type option in the Utilities Menu. It is not mandatory to make an entry in this field. Pallets Out: This is for recording the number of pallets on the consignment when it is delivered. It is not mandatory to make an entry in this field. Type: This is for pallet type as set up in the Pallet Type option in the Utilities Menu. It is not mandatory to make an entry in this field. Trip Time: The trip time is the estimated time of travel between origin and destination on the route code file. This will default from the route code file if it has been entered there. Time Slot: If there is a pre-determined time slot for delivery of the consignment, this can recorded on the consignment note entry. Pallet Spaces: The pallet spaces field is to record the number of spaces taken up on the vehicle by the freight. This may vary from the number of pallets entered earlier, due to either stacking of pallets or oversized pallets. Manifest: The manifest number will be inserted on the consignment entry screen after the manifest has been generated. Status: The status refers to the status of the consignment note, there are four statuses. ‘Quote’ indicates that the consignment has been entered and a quote issued. The quote can be printed and issued to your customer, when the quote has been accepted, the status can be changed to incomplete and the quote is converted to a consignment note. 'Incomplete' indicates that the consignment has been entered but is not yet ready for invoicing. 'Complete' indicates that the consignment is ready for invoicing and the GST has been calculated. 'Invoiced' indicates that the invoice has been printed. Amount: The amount will calculate and display on the consignment entry screen when the consignment is saved. Instructions: The instruction field is for recording any special notes relating to the consignment. Hazardous: A tick can be placed in this field to indicate hazardous freight. Class: The class of hazardous material can be recorded. When all relevant fields have been completed on the consignment entry screen, select the 'create an auto generated manifest' option. The following screen will appear for recording which company vehicle or contractor vehicle moved the freight. Create an Auto Generated Manifest
The manifest can be created at point of consignment entry or can be created separately and the consignments attached later. For more information on the latter option, refer to the Manifest section of this manual. Company: This will default to the main company record - eg. Company A = Your Company Name Manifest Number: The manifest number can be manually entered, if required, or if the field is left blank, the system will automatically generate a number. The manifest number must be unique. Trip Number: The trip number can be manually entered, if required. This is not a mandatory field so it can be left blank. Route Code: The route code will default from the consignment entry screen. This is the delivery route as set up in the route code files in the File menu. A valid route code must be entered in this field. Vehicle: This is the vehicle as set up in the vehicle master file in the File Menu. By entering the vehicle code here, it enables reports relating to the freight transported by that vehicle to be generated. Once the manifest is updated to Fleetmate, reports on vehicle profitability and fuel usage can be generated. Driver: The driver codes are set up in the File Menu under the Employee records and this relates to company drivers. By entering the driver code here, it enables reports relating to the freight transported by that driver to be generated. Phone Number: The phone number defaults from the employee record file or it can be entered manually. Quantity: The unit by which the payment is calculated. Rate: The rate by which the payment is calculated. Payment: The quantity multiplied by the rate. The quantity, rate and payment fields are for recording of information only and are not mandatory. Driver's Hours: The driver's hours field is for recording the number of hours the driver took to complete the trip. Trailer 1: The trailer is entered here to record a vehicle/trailer combination. Trailer 2: A second trailer can be added to the vehicle/trailer combination if required. Trailer 3: A third trailer can be added to the vehicle/trailer combination if required. Instructions: The instruction field is for recording any special notes relating to the manifest. Contractor: This is the contractor as set up in the Contractor file in the File Menu. Entering a contractor code here enables the manifest to be priced and updated into the contractor accounts ready for paying the subcontractor. Name: The name will be brought across from the contractor file when the contractor code is selected. Contractor's Driver: The contractor's driver name can be recorded here. Contractor's If the contractor requires a reference number to be quoted, this can be Reference: recorded in the contractor’s reference number field. Description: The description defaults from the description on the route code file. Charge by: This is the unit by which the contractor will be paid, eg. kilometres, tonne, etc. Quantity: This is the number of units the contractor will be paid. Rate: This is the rate by which the contractor will be paid. Contractor rates can be set up in the Contractor Rates file in the File Menu. Rates set up here use a combination of route code, charge code and rate. Payment: The system will first check if there is a route/charge code/rate combination set up in the contractors rate file. If no combination is found, the payment is calculated by multiplying the quantity by the rate to get the amount. Department: This is the general ledger department that relates to the subcontractor cost. General Ledger: This is the general ledger account that the subcontractor cost is allocated to. Due Date: This is the due date for payment to be made to the contractor. Tax Invoice Number: The supplied tax invoice received from a contractor can be recorded in this field. Contract Hours: The contractors hours field is for recording the number of hours the contractor took to complete the trip. Contractor Rego: This is for recording the contractor vehicle registration number. Origin: The origin is the pick up point of the consignment. Destination: The destination is the delivery point for the consignment. E.T.D. Estimated time of departure. E.T.A. Estimated time of arrival.
Select 'YES' and the following screen will appear.
Reference: The reference number field can be used to record a number, other than the consignment number, that is of importance to the consignment. A report can be generated by reference number if required. Product: The Product code is set up in the File Menu and is one of the criteria used in setting up customer or standard pricing. Serial No.: The serial number field can be used to record a number, other than the consignment number, that is of importance to the consignment. A report can be generated by serial number if required. Charge Code: The Charge Code is set up in the Utilities Menu and is one of the criteria used in setting up customer or standard pricing. The charge code can be set to calculate by items, weight or volume. Items: The number of items to be charged. If the charge code has been selected to charge by item, the system will search for a product/charge code combination in the pricing files and will pick up the rate from that file and insert it in the 'Rate' field. Weight Total: The total weight to be charged. If the charge code has been selected to charge by weight, the system will search for a product/charge code combination in the pricing files and will pick up the rate from that file and insert it in the 'Rate' field. Volume Total: The total volume to be charged. If the charge code has been selected to charge by volume, the system will search for a product/charge code combination in the pricing files and will pick up the rate from that file and insert it in the 'Rate' field. Rate: The rate to be charged to the customer (ex gst). This rate can come from the pricing files set up in the File Menu or it can be manually entered. Charge Amount: The charge amount will be calculated from the items, weight or volume that has been entered and multiplied by the rate. Description: The product description. This will pick up from the Product file in the File Menu. This description can be manually over-written if required. Department: This is the general ledger department that relates to the revenue earned. General Ledger Code: This is the general ledger account that the revenue is allocated to. Save & New: If more than one product or detail is to be included on the consignment note, select the 'save & new' option. This will bring up a fresh consignment details screen. Repeat this option until all details have been entered on the consignment and then select 'save'. Save: Select 'save' to close the data entry for the current consignment. Cancel: If the 'cancel' option is used the consignment will close without saving any data that has been entered for the current entry. Browsing Consignments
Consignment Browse
Consignment QuoteThe consignment entry screen also doubles as a quote entry screen. By entering the status of the consignment as ‘quote’, you are able to produce a written quote to supply to a prospective customer. If the quote is accepted, simply edit the consignment status to ‘not complete’.
Consignment Note Browse
To display a consignment highlight the entry you wish to view then select display.
6.02 Dispatching consignmentsOnce a consignment is created, it is available to the dispatcher to allocate the job to a vehicle update the status of the job. Optionally, if used in conjunction with a mobile device, the job can be dispatched to the driver electronically for pickup / delivery. On entering this option the following dispatch screen is displayed showing a list of consignments. Information showing includes status, date, consignment number, customer, sender name and suburb, receiver name and suburb, manifest, vehicle, items and weight.
The dispatcher can assign the consignment to a manifest or vehicle by selecting from an available list of manifest or vehicles to dispatch to. Select the appropriate one from the “drop down” list of manifest or vehicles to allocate. To dispatch to a mobile device, click on “SEND” button. Available status’s are:
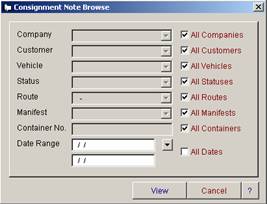
Consignments can be displayed as filtered by the selection criteria above the list of consignments. This selection includes combinations of sender. Receiver, customer, vehicle, route, manifest, status and date range. Completed jobs can be excluded or not. Allocated or non-allocated jobs can also be included or exclude. In the consignment list, all but the items and weight can be sorted by clicking on the heading of the field to be sorted on. For the consignment to be dispatched to a mobile device you must have started “DispatchMate” from the main menu. DispatchMate is a program that operates in the back ground and can be located on the task bar of the computer. It’s function is to send jobs to the vehicle and receive information back from the vehicle. Eg delivery status. 6.03 To Complete Consignments
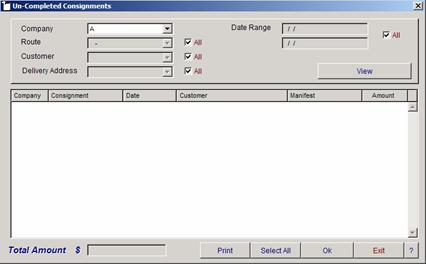
6.04 To Un-complete Consignments
6.05 Print Invoices
Invoice Reprint
6.06 Cancel Invoices
Select the consignments to be uncompleted, go to enter deliveries, edit the consignment, save changes, then complete consignment ready for invoicing again. If the consignments that were on the cancelled invoice have been edited and re-invoiced, the new invoice will have a new invoice number. The printed invoices are now ready for updating to Debtors accounts. 6.07 Cancelled Invoice List
If an invoice has been cancelled, that invoice number will no longer be available but can be found on the cancelled invoice list report. 6.08 Export Invoices
6.09 Lookup Consignment
|
 In this screen, you will record the customer to charge, the pickup and delivery date and the pick up and delivery location. There are also fields for recording the information relating to pallets, trip time and an area to record any special instructions there may be relating to this consignment.
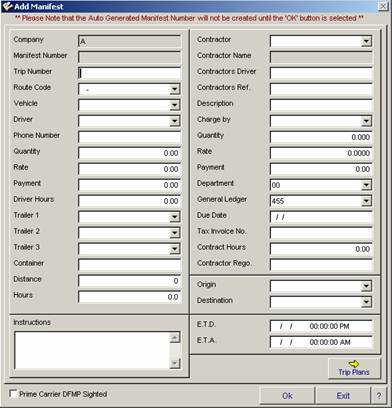 The left-hand side of the manifest screen is for recording information relating to a company vehicle and the right-hand side of the screen is for recording subcontractor information.
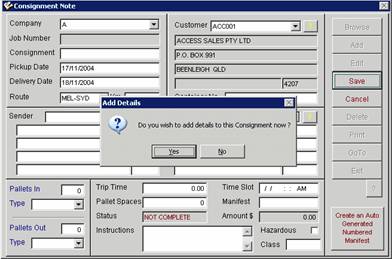 When all relevant fields have been completed, select the "OK" button. You will be asked if you wish to enter pricing details to the consignment.
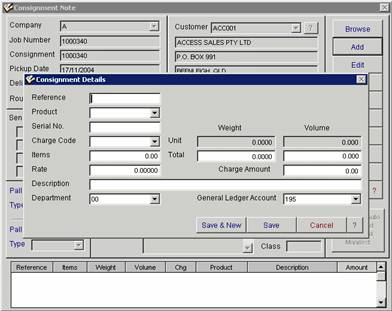 You are now able to enter the price (ex GST) to charge your customer. Pricing can be entered manually or can be set up in either the Customer Pricing file or the Standard Pricing file. When entering a customer, route code, product and charge code combination the system will search for a match in the Customer pricing file, if no match found it will search the Standard pricing file. If no match found a popup message appears in the upper right hand corner of the screen advising "no pricing found". If no pricing has been found you are able to manually enter the rate for the consignment to calculate the charge amount.
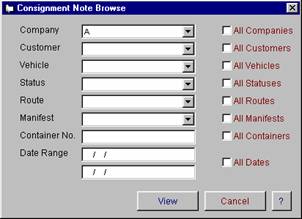 To browse consignments, select the browse button. Select search criteria to view and select view. This will now bring up a browse window with the information found for the criteria you selected.
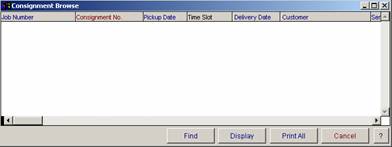 To view details of a selected consignment, highlight it and select display.
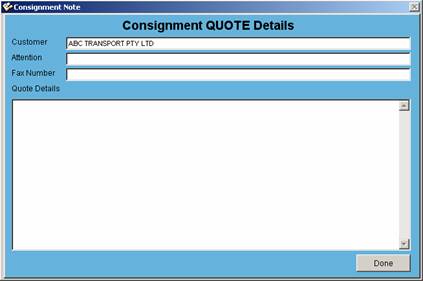
 To browse consignments, select the browse button on the consignment entry screen. Select criteria to view and select view. This will now bring up a browse window with the information found for the criteria you selected.
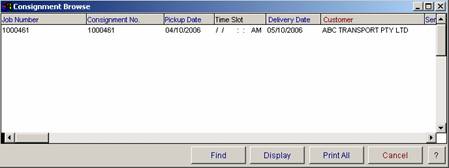
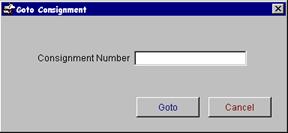 Alternatively, if you are in the consignment entry screen and need to go to a particular consignment, simply select the ‘goto’ button. The goto consignment box will appear, enter the consignment number you wish to view then select goto. The consignment will then be displayed.
 Consignments must be completed before they can be invoiced. To complete a consignment, select the consignment or block of consignments and select ok. You have the ability to select all of the consignments. You have the ability to view the consignments by the route code, customer delivery address or date range.
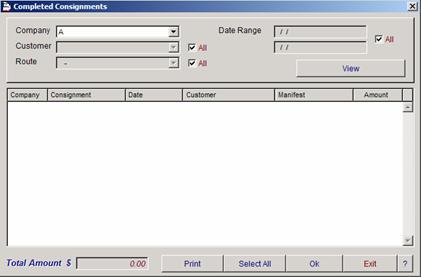 Consignments can be un-completed if you have completed them and you need to alter it. To un-complete the consignment, select the consignment or block of consignments and select ok. You have the ability to view the consignments by route code.
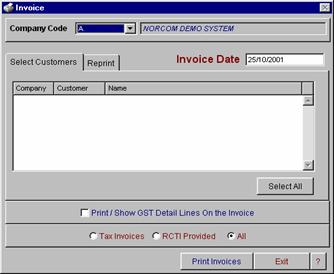 The invoice deliveries option enables you to invoice completed deliveries. To invoice deliveries, select the customers to invoice and select print invoices. The invoices that have been printed will no longer appear in this section but if invoices need to be re-printed, they will appear in the reprint tab on this page.
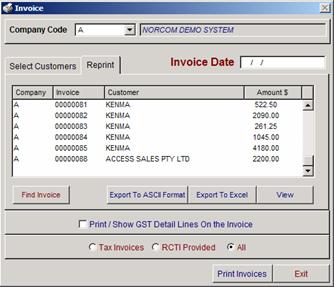 To reprint an invoice, select the ‘Reprint’ tab. Select the invoice you wish to reprint by highlighting in the list of displayed invoices, or you can select the ‘Find Invoice’ button, enter the invoice number and then select ‘Find’. The invoice can then be previewed to screen, printed or exported to an ASCII file or an Excel file.
 The cancel invoices section allows you to cancel invoices that have been printed. You cannot cancel invoices that have been updated to debtors. To cancel invoices, select the invoice or invoices to cancel and select ok. The consignments attached to that invoice will now appear in the “to uncomplete consignment” option for alteration or re-invoicing. Only the consignments that require alteration or deletion need to be uncompleted.
 The update to debtor’s option allows you to update invoices to debtors. You can select the company to update the invoices to, and you have the ability to print the invoice list prior to updating. To update invoices, select the invoice or invoices to update, enter the company to update to and select the update button. You can select individual invoices or all invoices. Once the transactions have been updated, they will no longer appear in this list. Once invoices are updated, they cannot be brought back. They will need to be corrected in debtors’ accounts.
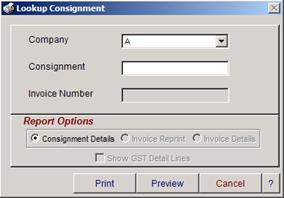 The lookup consignment option allows you to recall consignments from history. To view a particular consignment, enter the consignment number you wish to view then select the report option required and then select preview. The consignment information will then be displayed to screen. You also have the option to print the consignment.
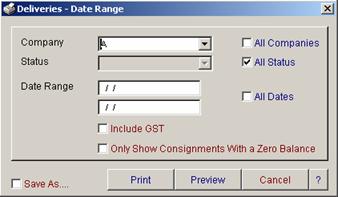 6.10 Show Deliveries by Date Range
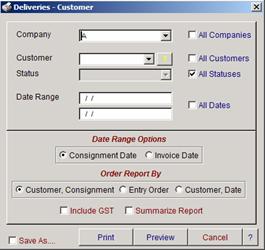 The deliveries by customer report allow you to list all of the consignments entered between specific date ranges. You also have the ability to filter the report by customer and status, consignment date or invoice date. The report can be ordered by customer consignment, entry order or customer date, include GST or in detail or summarised form. You can print, preview or export the information to an Excel file.
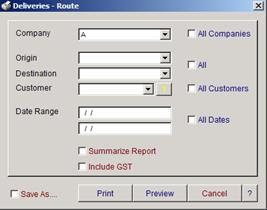 The ‘deliveries by route’ report allows you to list all of the consignments entered between a specific date range. You also have the ability to filter the report by customer, origin and destination. The report can also be generated to include GST or in detail or summarised form. You can print, preview or export the information to an Excel file.
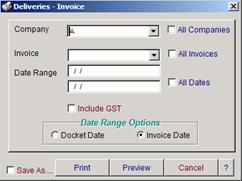 The ‘deliveries by invoice’ report allows you to list all of the consignments entered between a specific date range. You also have the ability to filter the report by invoice number, and can be ordered by docket date or invoice date. The report can also be generated to include GST. You can print, preview or export the information to an Excel file.
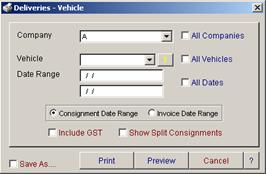 The ‘deliveries by vehicle’ report allows you to list all of the consignments entered between specific date ranges. You also have the ability to filter the report by vehicle and can also be generated to include GST and to show split consignments. You can print, preview or export the information to an Excel file.
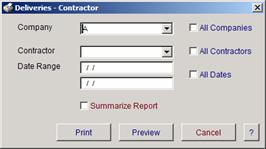 The ‘deliveries by contractor’ report allows you to list all of the consignments entered between specific date ranges. You also have the ability to filter the report by contractor and can also be generated to include GST. You can print, preview or export the information to an Excel file.
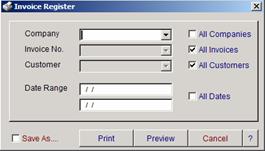 The ‘invoice register’ lists all of the invoices printed between a specific date range. You also have the ability to filter the report by customer and invoice number. You can print, preview or export the information to an Excel file.
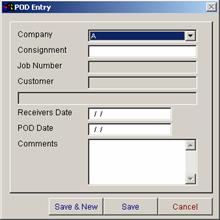 The ‘POD Entry’ screen allows a POD date and receiver date to be allocated against a consignment. Open the POD entry screen, enter a consignment number, the customer name will be generated from the consignment number. Enter a receiver’s date and a POD date and comments if required. Reports can be generated listing consignments with or without POD’s.
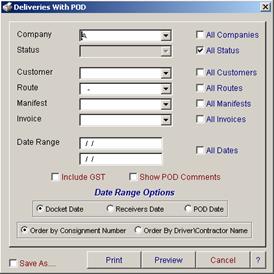 A ‘Deliveries with POD’ report can be generated listing consignment status, customer, route, manifest, invoice number and date range. It can be generated by docket date, receivers date, POD dates, and also to include GST and to show POD comments. The report can be ordered by consignment number or driver/contractor name. You can print, preview or export the information to an Excel file.
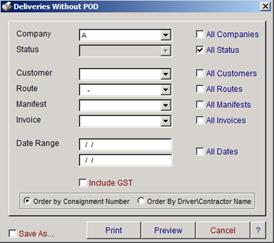 A ‘Deliveries without POD’ report can be generated listing consignment status, customer, route, manifest, invoice number and date range. The report can be ordered to show GST, by consignment number or driver/contractor name. You can print, preview or export the information to an Excel file.